Qlik-CLI allows you to manage your Qlik environment using the command line. This in turn makes it easier to automate certain tasks such as:
- Import, export, publish, and republish apps.
- Create, rename, remove, and update spaces and assign user access.
- Build, analyze, and edit apps.
- Administer tenants (and client-managed sites)
All this information on its use can be found here https://qlik.dev/toolkits/qlik-cli/. This page walks through my experience installing onto the Ubuntu lynux system https://ubuntu.com/.
Configuring Ubuntu on Windows
First install WSL onto windows https://learn.microsoft.com/en-us/windows/wsl/install, this will get you Ubuntu onto your machine
Open Ubuntu from the start menu, everything from now on you do in there
Install Brew (https://dikabrenda.medium.com/how-to-install-brew-on-ubuntu-20-04-lts-linux-714c73379dd4)
sudo apt update
sudo apt-get install build-essential

sudo apt install git -y

/bin/bash -c "$(curl -fsSL https://raw.githubusercontent.com/Homebrew/install/HEAD/install.sh)"

eval "$(/home/linuxbrew/.linuxbrew/bin/brew shellenv)"
Install Qlik CLI
Once its working, then install Qlik CLI https://github.com/qlik-oss/qlik-cli?tab=readme-ov-file#completion
brew tap qlik-oss/taps
brew install qlik-cli


You should now be able to see the Qlik commands associated with the CLI package.
Set Up Context
Contexts contain the connection information you need to connect to your Qlik Cloud instance. You can either use API keys or OAuth. https://qlik.dev/toolkits/qlik-cli/qlik-cli-contexts
To set up a connection firstly navigate to the QMC and then API Keys. Generate New (you need the right level of security to do this) and follow the instructions. You’ll be give a long API Key which you need to copy and save for use when setting up context. You also need the URL to your tenant.

Return to Ubuntu and set up your context, follow the prompts to add in all the information.
qlik context init
You can now interact with your tenant and pass instructions to the API via the command line. For example here we can list the streams:
qlik space lsCreate your first Bash shell script
From Ubunto you can access vs code with the command
. code
This will give you access to your home directory and from there you can create folders and files. Here we are going to create and make executable and a simple Bash script “Hello World”. (remember to se the correct terminal or run the code directly from Ubuntu)

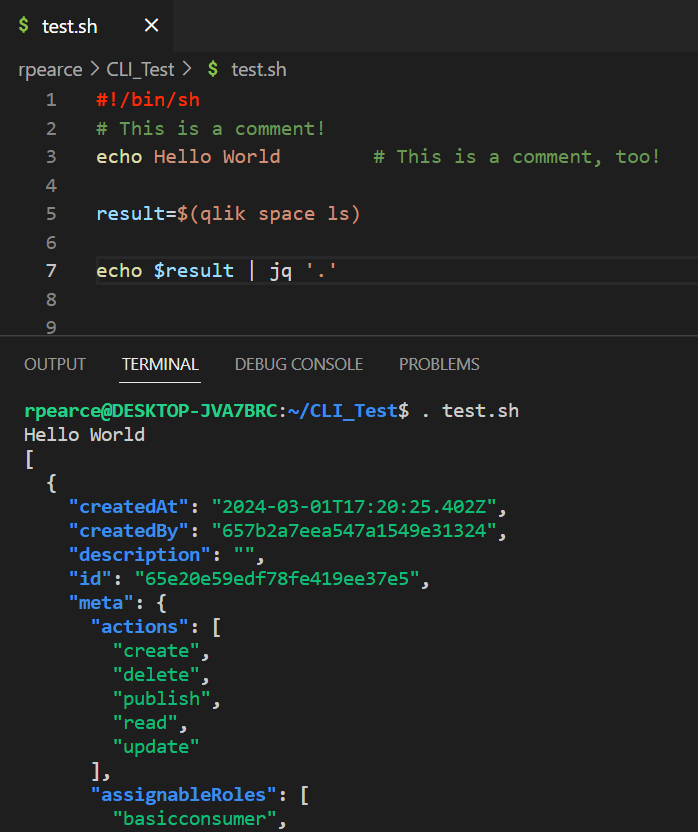
Now we have a script that’s running we can start referencing the Qlik-CLI commands.

The reply is in a JSON format. To work with Qlik API replies you will need to be able to handle JSON, for this I use jq https://www.baeldung.com/linux/jq-command-json. Its easy to install as you already have HomeBrew.
$ brew install jq We can now see this in action by piping in jq
Now, lets count the Spaces in the tenant…

Hopefully this guide will help you start in your CLI journey.
Happy Qliking.

Pingback: Qlik Sense SaaS API Connection using Python | qlikcentral·